Pyxl.ai
Documentation
Master Pyxl.ai
Your complete guide to innovative website building
Introduction
About Pyxl.ai
Welcome to Pyxl.ai, where we empower your vision with cutting-edge technology. Our platform is specially tailored for startups and small businesses, offering a seamless way to create professional, optimized websites. Our mission is to simplify the web creation process, covering 98% of the needs a startup or small business might have.
Unlock the potential of our custom GPT-driven model to generate functional multipage websites that stand out. Our tool is not just a platform; it's your creative partner, ensuring every website you create not only meets but exceeds professional standards.
To unlock the full potential of Pyxl.ai, consider subscribing to our service. Visit our Pricing page to see all the benefits and features available with our subscriptions.
Getting Started
Ready to take the next step in your business journey? Explore our GPT model here and start building your dream website today!
For more information or personalized assistance, reach out to us at cs.catchypage@gmail.com.
ChatGPT Integration
About Our Custom GPT
Unlock the power of advanced AI with Website Instantly, designed specifically to help you create and manage multipage websites effortlessly. This revolutionary tool adapts to your needs, allowing you to communicate directly with the AI to develop a site that perfectly aligns with your vision. Whether you're building an online presence for a new business or upgrading your existing digital platform, our GPT makes it easier than ever to achieve a professional, optimized website. Engage with the AI, dictate your requirements, and watch as your ideas come to life through a streamlined, intuitive process. Start creating with our GPT today and propel your digital strategy to new heights!
How to Use
Step 1: Begin Your Website Creation
Starting with our GPT is your first step toward creating a custom website. Just express your ideas directly in the chat—for example, say "Create a website for an animal shelter." Our AI will then ask for more details about your project to tailor the website to your needs.
Step 2: Interactive Design and Customization
As you detail your requirements, the conversation with our AI will guide you through refining your website. If you're unsure about any step, just ask, and the GPT will provide helpful suggestions and clarifications.
Step 3: Further Customization in Our Editor
After the basic setup, you can manually adjust and enhance your website in our editor. This flexible environment allows for deeper customization to ensure your website perfectly matches your vision.
Adding and Managing Content
Once your website’s structure is in place, you can use the following functionalities to add and manage content:
- Create, Update, and Delete Pages: Easily add new pages, update settings, or remove existing pages.
- Add Various Blocks: Enhance your pages with specific content blocks such as Blog, Features, Contacts, FAQ, Hero, Form, Pricing, and Catalog.
Step 4: Dynamic Content Management
Manage how content is displayed:
- Add Images and Logos: Incorporate custom images and logos to reflect your brand.
- Order and Delete Blocks: Organize the flow of your page by changing the order of blocks or removing unnecessary ones.
- Fetch Page and Website Structure: View the current layout of your pages and make informed adjustments.
Advanced Customizations
Adjust Page Settings: Modify your website’s overall settings or update individual pages to better suit your needs.
Interactive Schema Display: After changes, view an updated schema of your website to visualize the new structure.
Step 5: Ongoing Interaction and Support
Continue interacting with our GPT for further enhancements or troubleshooting. Our AI is here to assist you throughout the process, ensuring a seamless and enjoyable website creation experience.
Returning to Modify Your Website
Whenever you need to make changes or updates to your website, you can easily resume your interaction with our GPT by using the unique security key found in your website settings. This key ensures that only you can access and modify your website.
Accessing Your Security Key
Navigate to the settings section Dashboard of your website. Here, you'll find a unique key designated for your use. A convenient button allows you to copy this key with a single click.
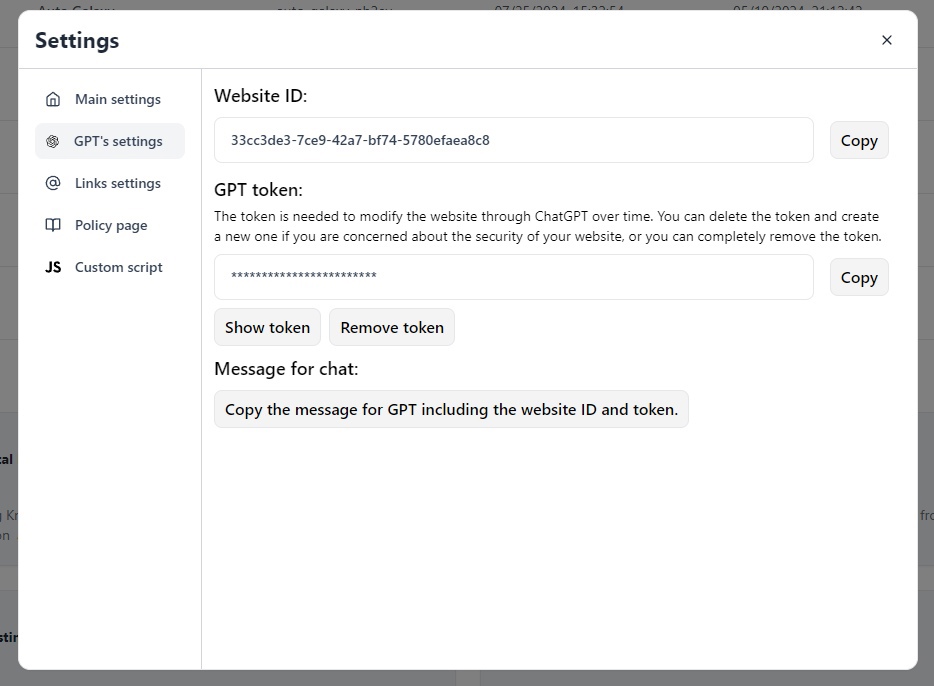
Using Your Key for Modifications
When you're ready to make changes, simply start a chat session and send the copied key. This will allow the AI to identify and retrieve your website's details, enabling you to continue making modifications effortlessly.
Security and Control
If you ever need to revoke access or enhance the security of your website, you can delete the existing key from your settings. This action will prevent any further changes until a new key is generated.
This process ensures that managing your website remains straightforward and secure, giving you the flexibility to make updates whenever necessary.
Website Editor
About the Editor
After creating a website with our GPT-powered model, you gain comprehensive control over your content. Our platform allows you to freely manage various elements of your site. You can add, edit, and rearrange blocks, modify texts and images within those blocks, and adjust their sequence to fit your vision. Additionally, you have the flexibility to create new pages, customize their URLs, and much more. Beyond these features, Pyxl.ai offers a range of other capabilities designed to enhance your website’s functionality and user experience. This level of customization ensures that your website not only looks unique but also functions exactly as you need it to, with endless possibilities for expansion and refinement.

Editor interface
How to Use the Editor
Editor Header:

Editor Header
- Page list, also used for switching between pages. (To reorder pages, use the global settings in the editor.)
- Button to create a new page.
- Button to disable interaction with the page in edit mode; can be enabled to check how buttons function, for example.
- Save button - don't forget to press it, even though there is an autosave feature that saves every minute if changes are detected.
Editor:
Blocks section:
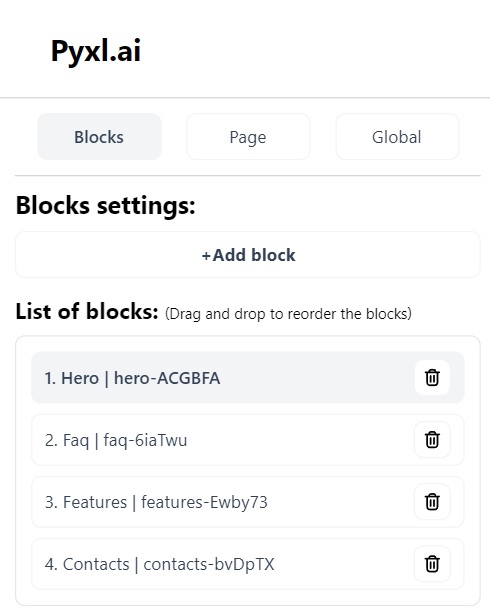
Blocks section
Blocks section abilities:
- Add Block: You can add a new block by selecting one from a menu.
- Current Blocks List: Displays a list of all existing blocks. Each block in the list shows its type and a unique ID.
- Block Settings: When a You click on a block from the list, the specific settings for that block appear below. Each type of block has its own unique settings.
- Reordering Blocks: You can change the order of the blocks using drag-and-drop functionality.
Page Section
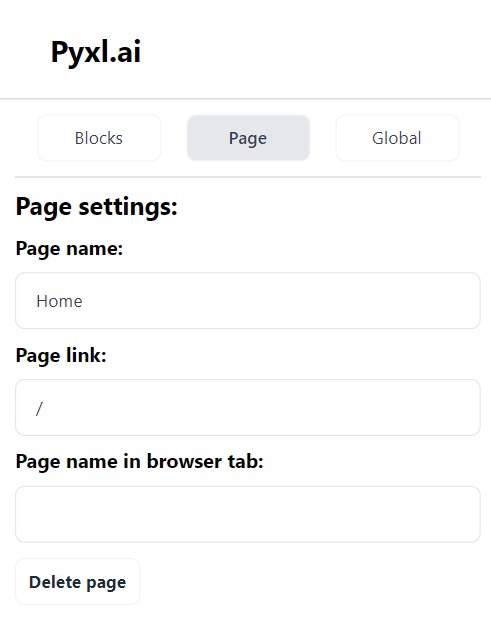
Page section
Page section abilities:
- Change Display Name of the Page: Users can edit the name that appears on the webpage itself.
- Edit Page URL: Allows for customization of the page's URL, which must be unique. The main page always has the URL "/".
- Change Browser Tab Title: Modify the title displayed on the browser tab.
- Delete Pages: Pages can be deleted with the exception of the main page, which cannot be removed as it's essential to have at least one page. To delete the entire site, users must go to the dashboard settings.
Global section:
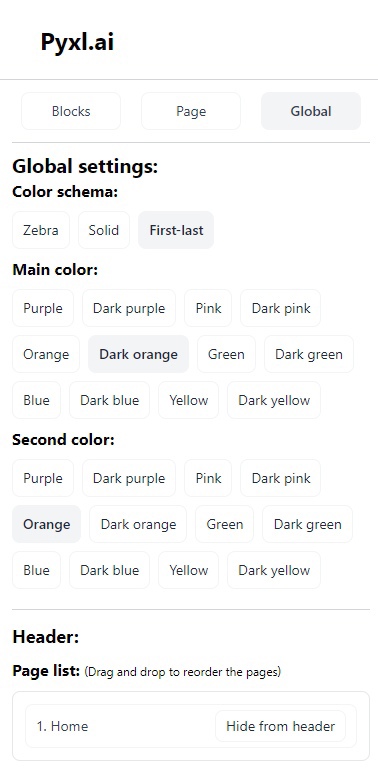
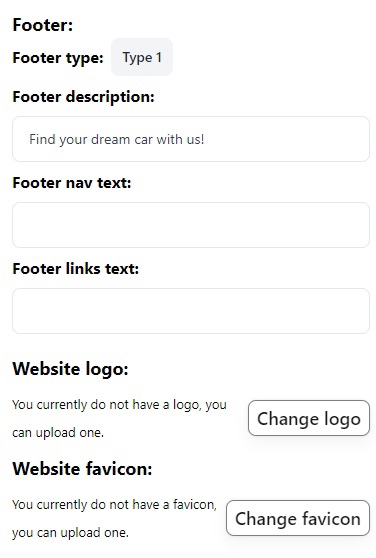
Global section
Global section abilities:
- Change Color Scheme: Users can modify the overall color scheme of the site, affecting all pages uniformly.
- Header and Footer Settings: Provides options to customize the appearance and content of the site's header and footer across all pages.
- Change Logo and Favicon: Allows users to update the site's logo and favicon, which are displayed across all pages and browser tabs respectively.
Donation Block
How to Set Up Customizable Donation Buttons
Our site builder enables you to create customizable donation buttons linked to payment systems such as Stripe. This guide will show you how to personalize your donation block, allowing dynamic changes to button labels, links, and donation amounts based on donor choices.
Step 1: Accessing the Donation Block Editor
Open the donation block within your site editor. You will see an interface similar to the provided screenshot.
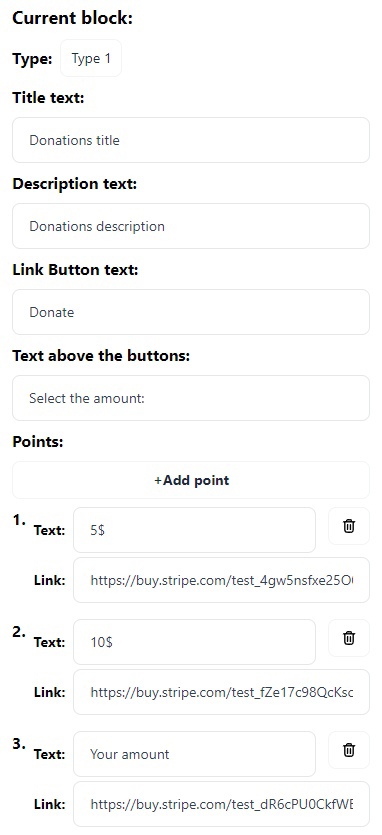
Page section
Step 2: Customizing Text, Amounts, and Links
- Editing Titles and Descriptions: You can edit the text for “Donations title” and “Donations description” directly within their respective fields to fit your campaign.
- Configuring Donation Buttons: Default donation amounts (e.g., $5, $10) can be edited by clicking on each button. Here, you can modify both the displayed amount and the destination link for the button. For a custom donation amount, configure the 'Your amount' button to let donors specify their own contribution.
Step 3: Dynamic Link Configuration
Mechanism Explanation: The mechanism is designed so that clicking on a specific donation amount button dynamically changes the link and label of the main “Donate” button. For instance, if a donor selects the $10 button, the main “Donate” button will update to reflect this choice, both in terms of the donation amount and the associated payment link.
Step 4: Creating and Integrating Payment Links with Stripe
- Generate Payment Links: Log into your Stripe dashboard to create payment links for fixed or custom amounts. Consult Stripe’s payment links guide for detailed steps. Copy the URLs for these links once created.
- Link Integration: Paste the Stripe URLs into the link fields of the corresponding donation buttons in the site builder.
Step 5: Publishing Changes
After configuring, testing, and verifying the donation block, save and publish your changes to make them active on your site.
The block is fully customizable, perhaps you can come up with better and more profound applications for it :)
Dashboard Settings
Privacy Policy Page
Add Privacy Policy Page: You can create a dedicated Privacy Policy page for your website. Within this feature, a text field is provided where users must enter the text of their policy following specific formatting rules. You can also request a privacy policy generated by GPT by providing our specific guidelines.
Formatting Rules for Privacy Policy Text:
- Main Header: Start with a hash (#) followed by the text for main headers (e.g., # Privacy Policy of [Your Site Name]).
- Sub Header: Start with two hashes (##) followed by the text for sub headers (e.g., ## Information Collection).
- Paragraphs: Write normal text without any prefixes for regular paragraphs.
- List Items: Start each item in a list with a dash (-) followed by the text for list items (e.g., - Information You Provide).
Custom Scripts
Custom Scripts Feature: Enhance your website functionality with our Custom Scripts feature. Available exclusively to subscribers, this tool allows you to add your own JavaScript code to every page of your site. It's perfect for integrating tools like Google Analytics, setting up personalized alerts, or adding unique interactive elements. Simply paste your JavaScript code into the provided input field. Subscribe now to unlock advanced customization options and elevate your website's capabilities to the next level.
Cookie Consent Window
Cookies consent window feature: You can create a pop-up window for your website through the settings panel, where you can fill out all the necessary fields, including the title, description, and button texts. Visitors to your site will see this pop-up window with the text you have configured.